Sabado, Agosto 29, 2015

Dorm Room Decorating: Big Style in a Small Space

Can you feel the nervous energy in the air? It’s back to school season and with that comes the mad scramble to personalize even the most drab, dingy, and minuscule of dorm rooms. It’s no secret that the struggle to dress up a dorm room can be overwhelming. But fear not! I’ve rounded up the best ideas for dorm room decorating to start off the school year in style.

Even the tightest squeeze of a dorm room can be transformed into a gorgeous living space with these 20 Chic and Functional Dorm Room Decorating Ideas. 

Take a nod from the DIY Network Blog Cabin 2015 to see how The Art of Upcycling can transform any space, even a dorm room. 

Short on cash? Don’t let that stop you. These 13 Budget Dorm Room Ideas will have your new digs styled for next to nothing.

Handy with DIY projects? Follow along with HGTV’s Marianne Canada as she makes over a dorm room in these 12 videos.

Don’t forget the details when decorating a door room – try out one of these 33 DIY Dorm Room Ideas.

The best advice is always from those who’ve been in your shoes. That’s why these Must Know Dorm Room Decorating Tips from College Students are indispensable.

Got a handle on the look you’re going for, but need a few small tweaks? These 8 Stylish Dorm Room Updates will have your space perfected in no time.

High tech can help make things a bit more comfortable in your small, shared space, so don’t miss this article on how to Tech Out Your Dorm by Carley Knobloch. 

So, there you have it. A fantastic start to the dorm room of your dreams. Are you a college student ready to make over your space? An upperclassman with wisdom to pass on? Comment to leave your tips!

Teen bedroom organizing ideas

*This post is sponsored by 3M* Do teenagers ever really have enough organizing? Especially girls. First there’s the clothes, then the shoes, then the make-up, then the jewelry, and the list goes on and on and on…. My 16 year old daughter had some major clutter issues going on, so we decided to go through […]

The post Teen bedroom organizing ideas appeared first on The Shabby Creek Cottage.

Huwebes, Agosto 27, 2015

The Cottage Studio: Behind the Scenes Part I

Have you seen, my finished She Shed Project with Home Depot on their Apron blog? I recently shared the completed version of transforming a TUFF SHED from top to bottom into my creative hub for all things Design and DIY. Once my sweet shed arrived, I couldn't help but rename it, the cottage studio it just felt to fitting. I love the idea of having a backyard cottage that's full of purpose and creativity. While its always fun to a see a before and after, personally I also love to see how spaces progress from bare bones in my cottages case from just studs on the inside to a fully finished studio on the inside with electric and air conditioning.


Planning Process

When we started the planning process for the shed, when checked with the city with live to determine if their were any zoning restrictions on installing a 10x12 shed in our backyard. In the city we live in Northern California, they have strict guidelines for how tall, how many square feet and how close a building can be with property lines before requiring a building permit. Working closely with Tuff Shed we made sure to stay within those guidelines. We choose a TR-700 Tuff Shed and a nine light door, framed by two 24x36 windows in the front and two 36x36 windows on either side. I kept the back of the wall window free, since I envisioned bookcases filling the back wall.

Electrical Process

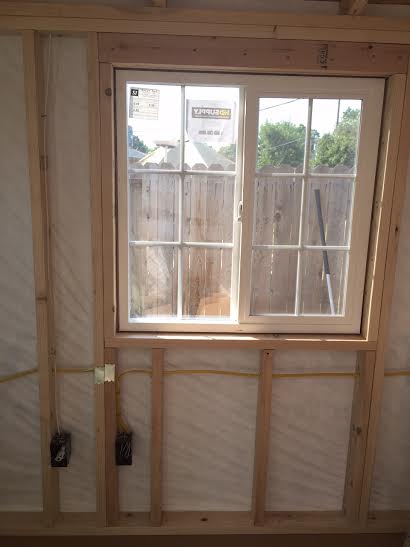
After the Tuff Shed was built [ read more about the process here ] we had to get ready for electrical. We visited the building and planning department and obtained a permit to run electrical from our house to the shed. Getting the OK to dig to run electrical was super exciting! We had to dig a 20ft trench from the end of our patio where our meter and electrical panel reside to our cottage, the trench had to be 18 inches deep to pass code. Friends, digging a 18 inch trench doesn't sound that deep, unless you have hard-pan soil and rocks the size of dinosaur eggs once you dig deeper than a foot, not my idea of fun. We ended up renting a 18 inch deep trencher from The Home Depot and did a lot of hand digging. Below is an interior picture of the Tuff Shed prior to the electric being run inside. Since we planned on running electric inside, Tuff Shed installed house wrap for us, making sure our shed would be water tight.


My husband and I have experience in changing out light fixtures, updating switches with dimmers but no experience in running power to a building, moving around amps in a main breaker box and installing electrical in an entire building or a sub panel. For this job it made THE most sense in hiring the electrical rough portion of the job out. Rough electrical basically means electrical wiring before the drywall has been covered up, and passed inspection. After receiving many quotes and talking with multiple electricians, we hired Sconce Electric to do the work, Greg the owner of Sconce Electric is simply fantastic! He and I worked on the outlet placement making sure everything was done to code and discussed at length my plans for the shed. I would highly recommend them on both big and small jobs. I'm not getting paid or getting a kick-back for saying this, just passing along good contractors to others.

Inside we have two switches one for the interior light, one for the exterior light fixture, and six outlets that all work! We also had the electrician run electric for an AC unit (details coming in another post) and run a phone line out there.

The day after the electrical was installed, I had my rough electrical inspection and we passed! Passing our inspection meant we were ready for insulation and drywall! The inspector who checked everything out, praised the electricians work and liked that we also choose to install a sub-panel at the shed. This means we can turn off power at both the shed and from our main breaker box. To save a little money on this job, we opted to do the finished electric ourselves meaning once the drywall was hung, we would install the outlets and light fixtures ourselves. Another way we saved money on the electrical was taking the time to get the permit ourselves, vs paying for the electricians time to do it.


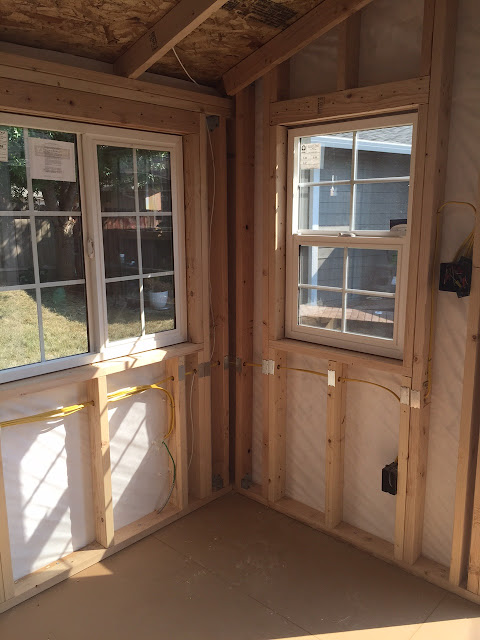
Since I knew I wanted a corner window seat inside my cottage, we placed these two windows on the corner. This is the previous view of the same space! It's amazing how different it looks.


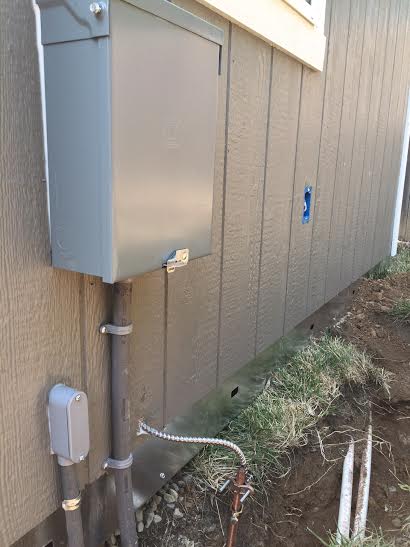
Below is the sub panel installed by our electrician, basically its a mini version of our main breaker box. Quick side note, all the outlets inside our grounded and our outside outlet is a GCFI enclosed in a weather proof outlet box.


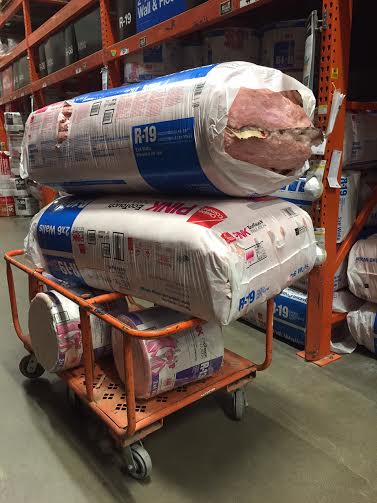
After the electrical was completed, Hasani and I spent an evening installing insulation on the walls and ceiling. To calculate how much insulation we would need to purchase, we used this calculator on The Home Depot website. This calculator also helped us determine our R - Factor. When installing insulation, its important to know which type of insulation is need for your walls and ceiling based on where you live.


Next up, I'll share the drywall process. I personally love drywall time, for me its when a room starts taking shape.

It’s Time: Get Started On Outdoor Fall Maintenance

I’m not wishing the last few weeks of summer away, but I feel Fall right around the corner. Cool air in the mornings, better sleeping at night, and delightful campfires that feel appropriately toasty (I think gone are the days of stifling in the humidity–phew, campfires on 90-degree evenings are a bad idea).

As our garden transitions from summer berries and greens to hearty squash and other autumnal favorites, the yard and landscape are making a gradual shift towards Fall as well.

Mums lining a fall garden bed.

Take advantage of the remaining nice weather, and get a jump start on preparing your yard and gardens for the beautiful Fall season:

Cleaning leaves are the most daunting of all of the chores. We have woodsy acreage, so my dream is to own something like a Cyclone Rake to make cleanup easier and faster, but for now our gas-powered leaf blower makes the job a lot more efficient than spending long weekends raking the yard. Building a compost for the fallen leaves would be a great way to make use of the hundreds of pounds I’m scheduled to collect over the next few months.

Now that the temperatures and humidity are dropping, check for air leaks and reseal your windows (best done on a breezy day), and paint the window exterior. You’ll be a step ahead of the game when it comes to weatherproofing your home for the winter.

Test for drafts in windows using a candle.

Make the most of these tips for lawn and landscape care:

It’s a good time to make repairs to your driveway and cement sidewalks. If you need to reseal your driveway, do it before the nighttime temps dip below 60-degrees. If your concrete steps are cracked, snow and ice can worsen them – take steps to repair and resurface concrete while the weather is still in your favor.

Looking to do something more creative with your pathways? Check out 9 creative driveway and pathway makeovers done on a budget.

Makeover your patio like one of these 9 cost-effective inspiration images.

Remember to check the gutters on your home too – be sure that they’re well attached, free of leaves, and in good condition by following these tips.

Let’s talk decor and general curb appeal. Remember to swap out your summery decor after Labor Day. Are you the cornstalk and pumpkins type? Favor burlap and leaf garland decor? How about making some DIY tombstones in anticipation of Halloween? If all else fails, settle for the most beautiful autumnal wreath of all time:

Create a beautiful fall wreath for your entryway.

Getting a few of these items done this time of year will alleviate the pressure to do so when the temperatures really drop, and you’ll enjoy more excuse to do projects outside of the house. Get more ideas for your outdoors here, on DIYNetwork.com

Mason Jar Pencil Holder

This post is sponsored by American Crafts. With school starting back, and with both of my girls taking college classes this year (one in university and one in dual enrollment), creating good storage to help them be organized is pretty important to me right now. Simple items seem to go missing the easiest, so I’m […]

The post Mason Jar Pencil Holder appeared first on The Shabby Creek Cottage.

Miyerkules, Agosto 26, 2015

Get Ready For Fall: Make This DIY Boot Brush

Make a DIY boot brush and scraper to help keep fall dirt and winter snow out of the house.

Even in a “take your shoes off” house, the dust and dirt from the yard can infiltrate deep beyond the entryway. And don’t get me started on snow – our soles get so wedged with snowballs that some days you might think that I tossed a shovel of snowplow sludge on the floor to melt.

Help to contain fall dirt, leaves, and wintertime slush with a new boot scraper brush just like this one. It’s an easy way to upcycle a broom, and because it’s weighted by a heavy slab of rock, you and the family can push your shoes against it without easily pushing it around (that’s my pet peeve with many boot brushes).

Simple fall decorating ideas

*thanks to Yankee Candle for partnering with me on this post* Fall decorating around my house has to be dead simple. Like plop a few pumpkins down, light a few candles, maybe some rescued branches from the yard and call it done. Halloween? I’m all over that one. I can decorate for Halloween with the […]

The post Simple fall decorating ideas appeared first on The Shabby Creek Cottage.

Martes, Agosto 25, 2015

Home Depot Workshop: DIY Vertical Planter

Happy Monday friends, its DIY Workshop with The Home Depot time again! As a quick reminder, I've teamed up The Home Depot as a DIY Influencer to host DIY Workshops in store. Teaming up with the The Home Depot is fun opportunity to share with you fun DIY building projects, that are skill building helping build confidence using power tools and taking you though the building process from start to finish, My first Workshop was Building a DIY Vertical Planter, the next project was Building a DIY BBQ Grill Cart. I had an absolute blast co-hosting the workshops and hanging out with The Home Depot teams at each store.

As you know, The Home Depot is the go to spot for tools, supplies and projects both big and small, they have it covered. For the September DIY Workshop, my friends will be sharing how to build a DIY Hanging Planter. For the upcoming workshop in September, I'll be in England visiting my bestie and unable to attend, boo! However, I'm still building a DIY Customized version of the hanging planter and will share very soon along with a quick how to.

My fellow DIY Workshop Blogger friends will be at various locations around the country hosting DIY Workshops at Home Depot stores. I hope your able to join them at the store locations, please see below for more information.


Please stop by my friends blogs for more details: Chris ManMade DIY, Michelle Decor and the Dog, Jamie That's My Letter, Jen House of Wood and Jamie C.R.A.F.T. I'm so looking forward to seeing the DIY Customized Version of the hanging planter my DIY buddies made!

Please click here to register for the DIY Hanging Planter Workshop here. Also my friends will be live Tweeting and Instagram during the Workshop, please check out #DIYWorkshop to see what they're up to.

Sabado, Agosto 22, 2015

25 affordable farmhouse light fixtures

Farmhouse style is hands down my go to my decorating style. I might dress it up a bit with some different influences, but at the root of it all my home is heavily influenced by my rural surrounding and it definitely feels like a farmhouse. One of the hardest parts for me has always been […]

The post 25 affordable farmhouse light fixtures appeared first on The Shabby Creek Cottage.

Biyernes, Agosto 21, 2015

Simply the Best of QuiltWeek 2015

“Simply the Best,” by Barbara Lacey

As we were heading out of our house on vacation last week, my husband casually commented to me, “Oh! Did you hear there’s some quilt show happening not too far from where we’ll be staying? I just heard a story about it. It’s called Quilt… something?” The happening he was referring to was the American Quilter’s Society’s annual QuiltWeek event and its 2015 stop in Grand Rapids, Michigan. As a quilter, hitting up the show on our way home was a must-do and was quickly added to our vacation schedule.

Grand Rapids was just one of the stops for QuiltWeek 2015, with the show also visiting Albuquerque, N.M., Lancaster, Penn., Paducah, Ky., and Syracuse, N.Y., so far this summer and Chattanooga, Tenn. and Des Moines, Iowa up next on the schedule. Open to the public and members of the society, the show offers lectures, workshops and a vast collection of vendors representing companies both big and small from across the country.

As someone who defines herself as a modern quilter, I was very curious to see what the show had to offer to other quilters like myself. While the show was set up to please a variety of quilting tastes, with the biggest being that of traditional quilters, the modern mindset was definitely represented on the show floor.

While I wasn’t able to take any workshops this time around, the Grand Rapids stop did offer modern quilters classes in improv piecing, working with curved designs and even contemporary crazy quilting. With just a few hours to explore the show, I focused my attention on the show floor. For my fellow modern quilters out there, here are some of my show favorites and noted trends from Grand Rapids. If you’ve been to QuiltWeek this year and enjoy modern quilting, what were some of your favorite takeaways?

Text on Fabric
I was excited to see Debbie Dominy, of Elkhorn Quilt Company in Mesa, Ariz., set up as a shop at QuiltWeek. I first met Debbie earlier this year at QuiltCon and really appreciated her mix of contemporary fabrics up for grabs. I asked Debbie what had been a big seller this week and she said she couldn’t stock fabric printed with text fast enough. Almost every vendor I visited offered fabrics with text on them and shoppers were happy to snatch it all up.

Collage Quilts
Art quilts have never caught my eye so much! Laura Heine of Fiberworks, located in Billings, Mont., creates beautiful collage-style quilts as kits or individual patterns. This approach to quilting is a genius way to use up your scraps and let your eye for color and design take over. Her whimsical booth was packed during our visit.

Faces Front and Center
For those following the news coming out of QuiltCon this year, you know that Melissa Averinos’ Face #1 was a huge hit with attendees. Ever since then I’ve started seeing face-themed quilts everywhere and QuiltWeek was no different. Deborah S. Hyde’s “Sam in Sunlight” won Best Use of Color at the show and had a long line of attendees snapping pictures from all angles.


There was even an entire guild challenge dedicated to “Famous Female Faces,” too.

DIY Fabrics
Tucked in the front corner of the show floor was Wendy Paskus of Stipples Etc. and her rich assortment of hand-dyed fabrics. Wendy has been dying her own fabric for 20 years and just started selling her work a few years back. Her colors are bold and striking. While she offers yardage of her colors, she sold small test strips for just a few dollars, a perfect addition to any quilter’s stash.

Fabrics for a Cause
Northcott was one of the biggest companies on the floor and was proudly sharing information about their Artisan Spirit Sandscapes collection. Looking at the fabric up close, the designs remind you of beautiful marbled papers, and that’s on purpose. The line is in honor of the work of the women of Prokritee, a fair trade company in Dhaka, Bangladesh. This Northcott line was inspired by their handmade papers, so a portion of the fabrics’ sales are donated back to the company. On the QuiltWeek show floor Northcott paired swatches of the fabric with images of the women, catching the eyes of all who walked by.

Best in Show
A quilt show isn’t complete without some wonderful quilts on exhibit! QuiltWeek had several rows of quilts dedicated to modern designs and the results were fantastic. Above are a few of my favorites. What was my No. 1 favorite quilt at QuiltWeek? I thought it might be hard to pick a favorite, but as soon as I saw Barbara Lacey’s Tina Turner quilt, titled “Simply the Best” and pictured up top of the post, the choice was obvious.

Curious to see what’s next for QuiltWeek in 2015? If you live by the last two cities featured in this year’s showcase, the Chattanooga stop takes place Sept. 16-19 and Des Moines is Sept. 30 through Oct. 3.

Shop Handmade From 50 Makers, One in Every State

Floridian Lin Glore crafted this custom stained-glass panel from vintage 1940′s Waterford Waffle dishes. The beautiful piece hangs in the Zen loft of DIY Network’s Blog Cabin 2015.

Working as the Design Coordinator for DIY Network’s Blog Cabin 2015 was a truly magical experience. Along with my best buddy, Project Manager Dylan Eastman, we were able to see this cabin’s creation from the ground up. The building itself is so beautiful, when it came time to fill it with home décor, we knew we had to find some special pieces.

Those who know Dylan or me know — we would have made every object in the house if we had the time. But with the sweepstakes set to end in mid-September, we just wouldn’t have had the time. So we did the next best thing. As a lover of all things handmade, I was able to locate one craftsman in each and every one of the 50 U.S. states and ask them to send us some very unique pieces for the cabin. I’m happy to report each of them sent something so incredible, we knew everyone needed to check them out.

So whether you’re early Christmas and Hanukkah shopping, looking for stuff for your own home or you’re just want to shop for things from this year’s Blog Cabin, I’d highly recommend that you take a look at this inspiring list of artists below. Find the one a gift made in your home state or in a state you love and it will mean that much more to you. Best of all, you’ll know that you’re getting something well-made from someone who cares very much about the quality of their products.

If you’d like to read more about the artists themselves, check out the five regional videos and photo galleries here.

I’d love to hear some of your favorite finds!

AlabamaReformed Wood – Reclaimed Wooden Shoe Rack

AlaskaAlaska Rug Company – Woven Bathmat

Arizona: Earthwind Stoneware - Garden Bells

ArkansasTeresa’s Plants & More - DIY Terrarium Kit

CaliforniaWe Are M.F.E.O – Fryslân Serving Tray

ColoradoEuro Dirt – Mini Horse Shoe Game

ConnecticutCharest Studios – Wire Hanging Baskets

DelawarePNB Studio – Fish Floater Sculpture

FloridaArtful Folk – Vintage Dish Glass Artwork

GeorgiaHickory Neck Co. – Stamped Spoon Garden Markers

HawaiiMy Manoa – Charcoal Soaps

IdahoRiver Stone Knobs – Stone Drawer Pulls

Illinois: 7M Woodworking – Hanging End Table

Indiana: DebBee In Stitches - Knitted Yoga Mat Bags

Iowa: Farm Timbers – Hand Carved Wooden Spoons

Kansas: Thirty-Six Degree Design – Marquis Letters

Kentucky: Patent Prints – Patent Artwork

Louisiana: frae & co. – Concrete Planters

Maine: Conversation Glass – Bottle Tea Light Holders 

Maryland: Slow Down Productions – Macramé Wall Hanging

Massachusetts: Cape Cod Shibori – Shibori Fabric

MichiganGreat Lakes Reclaimed – Bottle Opener/Cap Catcher

Minnesota: Western Art Glass – Glass Fish Artwork

Mississippi: Angel Daley Photography – Feather Photographs

Missouri: Belles and Ghosts – Constellation Artwork 

Montana: Raven Ridge Fiber Arts – Tussah Spinning Fiber

Nebraska: East Parlor – Woven Wall Hanging

Nevada: Ironclad Vintage Industrial MFG. CO. – Iron And Wood Shelf

New Hampshire: Hooked on Helping – Crocheted Bowl

New Jersey: Forage Workshop – Driftwood Coasters

New Mexico: Sunflower Glassworks – Green Glass Bowl

New York: Eva Design Studio - Geometric Animal Prints

North Carolina: Worley’s Lighting – Tree Branch Candle Holders 

North Dakota: Backyard Sawdust – Hand Carved Shaving Set

Ohio: Bijou Kitty – Animal Plushies

Oklahoma: Colorstory Designs – Magazine Art Installation

Oregon: Three Purple Orchids – Moon Artwork

Pennsylvania: Brandi Fitzgerald – Custom Throw Pillows

Rhode Island: New Moon Studio – Berry Picking Bowl

South Carolina: Tremundo Journals – Handmade Journals

South Dakota: Tough and Twisted – Iron Rose Sculptures

Tennessee: Bean and Bailey – Porcelain Salt Bowls

Texas: Adrift in My Mind – Reclaimed Wooden Artwork

Utah: Linton Art – Rustic Tree Print

Vermont: Wooden Pencil Company – State Bird and Fish Artwork

Virginia: Terribly Crafty – Heirloom Rug

Washington: Married to the Metal – Large Garden Markers

West Virginia: Richwood Creations – Handmade Recipe Box

Wisconsin: Haase Handcraft – Hexagonal Wall Shelving

Wyoming: Wyoming Woodturner Company –  Hand Turned Ash Bowl

Huwebes, Agosto 20, 2015

Strawberry Dream Pie

Hi there Shabby Creek Cottage readers! It’s Laura from Inspiration for Moms and today I have the perfect cool dessert for you. I think we can all agree, the summer heat is on high! Colorado in August can get extremely hot and uncomfortable. The last thing I want to do is turn on my oven. […]

The post Strawberry Dream Pie appeared first on The Shabby Creek Cottage.

Lunes, Agosto 17, 2015

Address Your Address With DIY House Number Ideas

How to make modern house numbers from cement.

This summer, I’ve been knee deep in curb appeal projects – I’ve finished updating the front door with a fresh coat of paint, landscaping (transplanting success), edged everything, and even made custom house numbers made from cut cement board. The DIY house numbers project was easy, adaptable (make them your own by choosing your own font!), not to mention, really affordable. The end result is a reflection of our modern, midcentury home, and the numbers great on the tree the end of the driveway.

When it comes to installing numbers on your home, you have to look at the location of the numbers and the scale of other features. There’s a time and a great place for small numbers (3″-4″ tall), but they can go unnoticed easily when they’re framed by the architecture in the wrong way. If you have oversized features, large numbers integrate well (6″-8″ tall). On this cottage, I really like the large arts and crafts style house numbers that fit in well with the oversized chairs, and the large wall-mount outdoor light.

House numbers for a cozy cottage.

Neon lights would look out of place on my home, but they’re a creative and unique consideration – especially for urban dwellers, whose neighborhood or district may already have a cool nighttime presence. Whether installed on the front of your home, or even as a sign hanging on the inside of your window a la any bar or diner, it would be a fun feature on which to anchor your home’s identity.

Neon sign used to create custom house numbers.

Also radical? Moss house numbers. The oversized scale of these numbers is right on, very whimsical and purposeful.

Earthy moss house number DIY.

Flank your front steps with a custom red wood planter with house numbers. The house numbers can be store-bought, handmade, or even applied with paint.

A DIY wooden box planter with a modern house number.

Repurposed paint sticks are put to use for this creative, stylish house number design. The wooden backing created by the paint sticks and special adhesive makes it easy to install them outside your home or apartment. Be sure to check out the creative installation tip, apartment dwellers – double-sided tape make this a temporary and inexpensive solution that looks great.

DIY House numbers for easy storefront identification.

Summer’s almost over and it’s time to address your fall decor (pun totally intended). Get creative this year and make house number pumpkins as a creative, eye-catching supplement to your home.

Pumpkins and flowers used together to create festive fall house numbers.

Get more ideas to make your home address more inviting* with these enticing curb appeal ideas:

DIY child’s step stool

Thanks to HomeRight for partnering with me on this post. Although my girls are definitely old enough to not need a step stool anymore, my little niece is just at that perfect age where she’s ready to try to conquer the world on her terms. At 2 years old, it’s not always easy, though. From […]

The post DIY child’s step stool appeared first on The Shabby Creek Cottage.

Biyernes, Agosto 14, 2015

Get Inspired: An Earthy Front Door Makeover

In every home that I’ve ever lived in, the decision to repaint the front door has been super worthwhile. If you need tips and more inspiration, learn how to paint a front door in my full tutorial.

A change in color can match a change in your own personality, such as to say “am I a sunny yellow, or feeling more mellow?” Door decorating–be it with a great wreath or paint–is an opportunity to refresh the appearance of your home in the eyes of everyday passers by, a slam dunk in the “Yes, I want my home to have wonderful curb appeal!” category. It shows pride, and love-of-home. Just look at this before:

White front door makeover.

And the after!

New green door paint on our front door.

I love a transformation!

I’ve been toying with different door color ideas for a few years, knowing that I wanted to choose a color that tied to a midcentury color palette; something colorful that wasn’t expected, something fresh, but classic and not out of place. I began by searching for paint swatches and palettes from the ’50′s (I like the O’Brien palette from 1953). Using a photo editing software, I over-layed the palette colors onto an actual photo of our white front door to test out which might work best for our home when flanked with the white storm door trim, blue-gray flagstone, and gray vinyl siding. This is a similar color selection process that I used when we painted our kitchen cabinets, and it worked perfectly for that project, so my hopes were high for this application as well.

Testing paint colors using a photo editing software.

I’ve never found color selection to be a very easy process, and I didn’t even have a color in mind when I began to narrow it down. As most indecisive people would report, I liked a lot of the colors we sampled, almost all of them in fact, but managed to bring the overall number of swatches down from 48 to 5. My husband and I agreed that the light pinks probably weren’t right, nor were the sky blues and lemony yellows. He gravitated towards the reds and dark oranges, I leaned towards the purples. We both liked the dark blues and a range of mossy greens, so we decided to commit to those shades, and pick up a bunch of paint samples.

How to use photo editing software to choose front door colors.

It’s best to review paint chips in the intended setting, because the amount of natural lighting can change the way colors look in reality. Some might suggest painting swatches of each color you like onto the door, but in a small space like on a door, I find looking at the paper swatches close to accurate if you can use your imagination.

Testing paint colors for the door.

Stepping back into the yard is what made the decision easier. Most colors looked nice with the roof, siding, and stonework, but the flagstone walkway and steps have a patina of mossy green that we knew would look great to incorporate. It wasn’t until we noticed this that we ruled out the dark blues, and started paying closer attention to the three colors on the bottom row, shown in the photos above and below.

Testing paint chips on a door.

The swatch we chose is the one in the center of the bottom row. Edamame green from Sherwin-Williams. The paint in the can is an exact match of the chip, but in actuality, it looks a bit different than the swatch on the SW website (literally more like the yummy appetizer, less like a sandy green-brown). I suspect natural lighting and the surrounding greenery on plants plays a part in this.

Front door curb appeal: transforming a midcentury front door.

Repainting the door lends new appeal to our home, and if that weren’t impacting enough, I also upgraded the hardware to improve the overall design of our entryway. If you like the clean lines of the deadbolt and knob I purchased for this entry, be sure to check out EMTEK. (Side note: Isn’t it crazy how a slightly different light can make the green in the photo above look grassy, but below look mossy! A true range that looks great in any light.)

Green door with EMTEK hardware.

Inspired by this front door makeover? See how I redesigned the inside of the door with wallpaper!

If you’re looking for a range of inviting front door colors, check out this gallery.